BAKED SUMMER SALMON RECIPE || WITH BLOOD ORANGE, FENNEL AND GARLIC BULBS


BAKED SALMON RECIPE 2small.jpg

Spring and Summer are my favorite times to eat fish. But I really could eat seafood everyday all year round. Lately, I've been into fresh, easy and fast. This wild alaskan salmon dish checks all the boxes and it’s so easy you can cook it with your eyes closed. Well maybe you might want them open? Either way let’s get cooking!


easy baked fish recipe

Serves 4-6 people

Ingredients: **

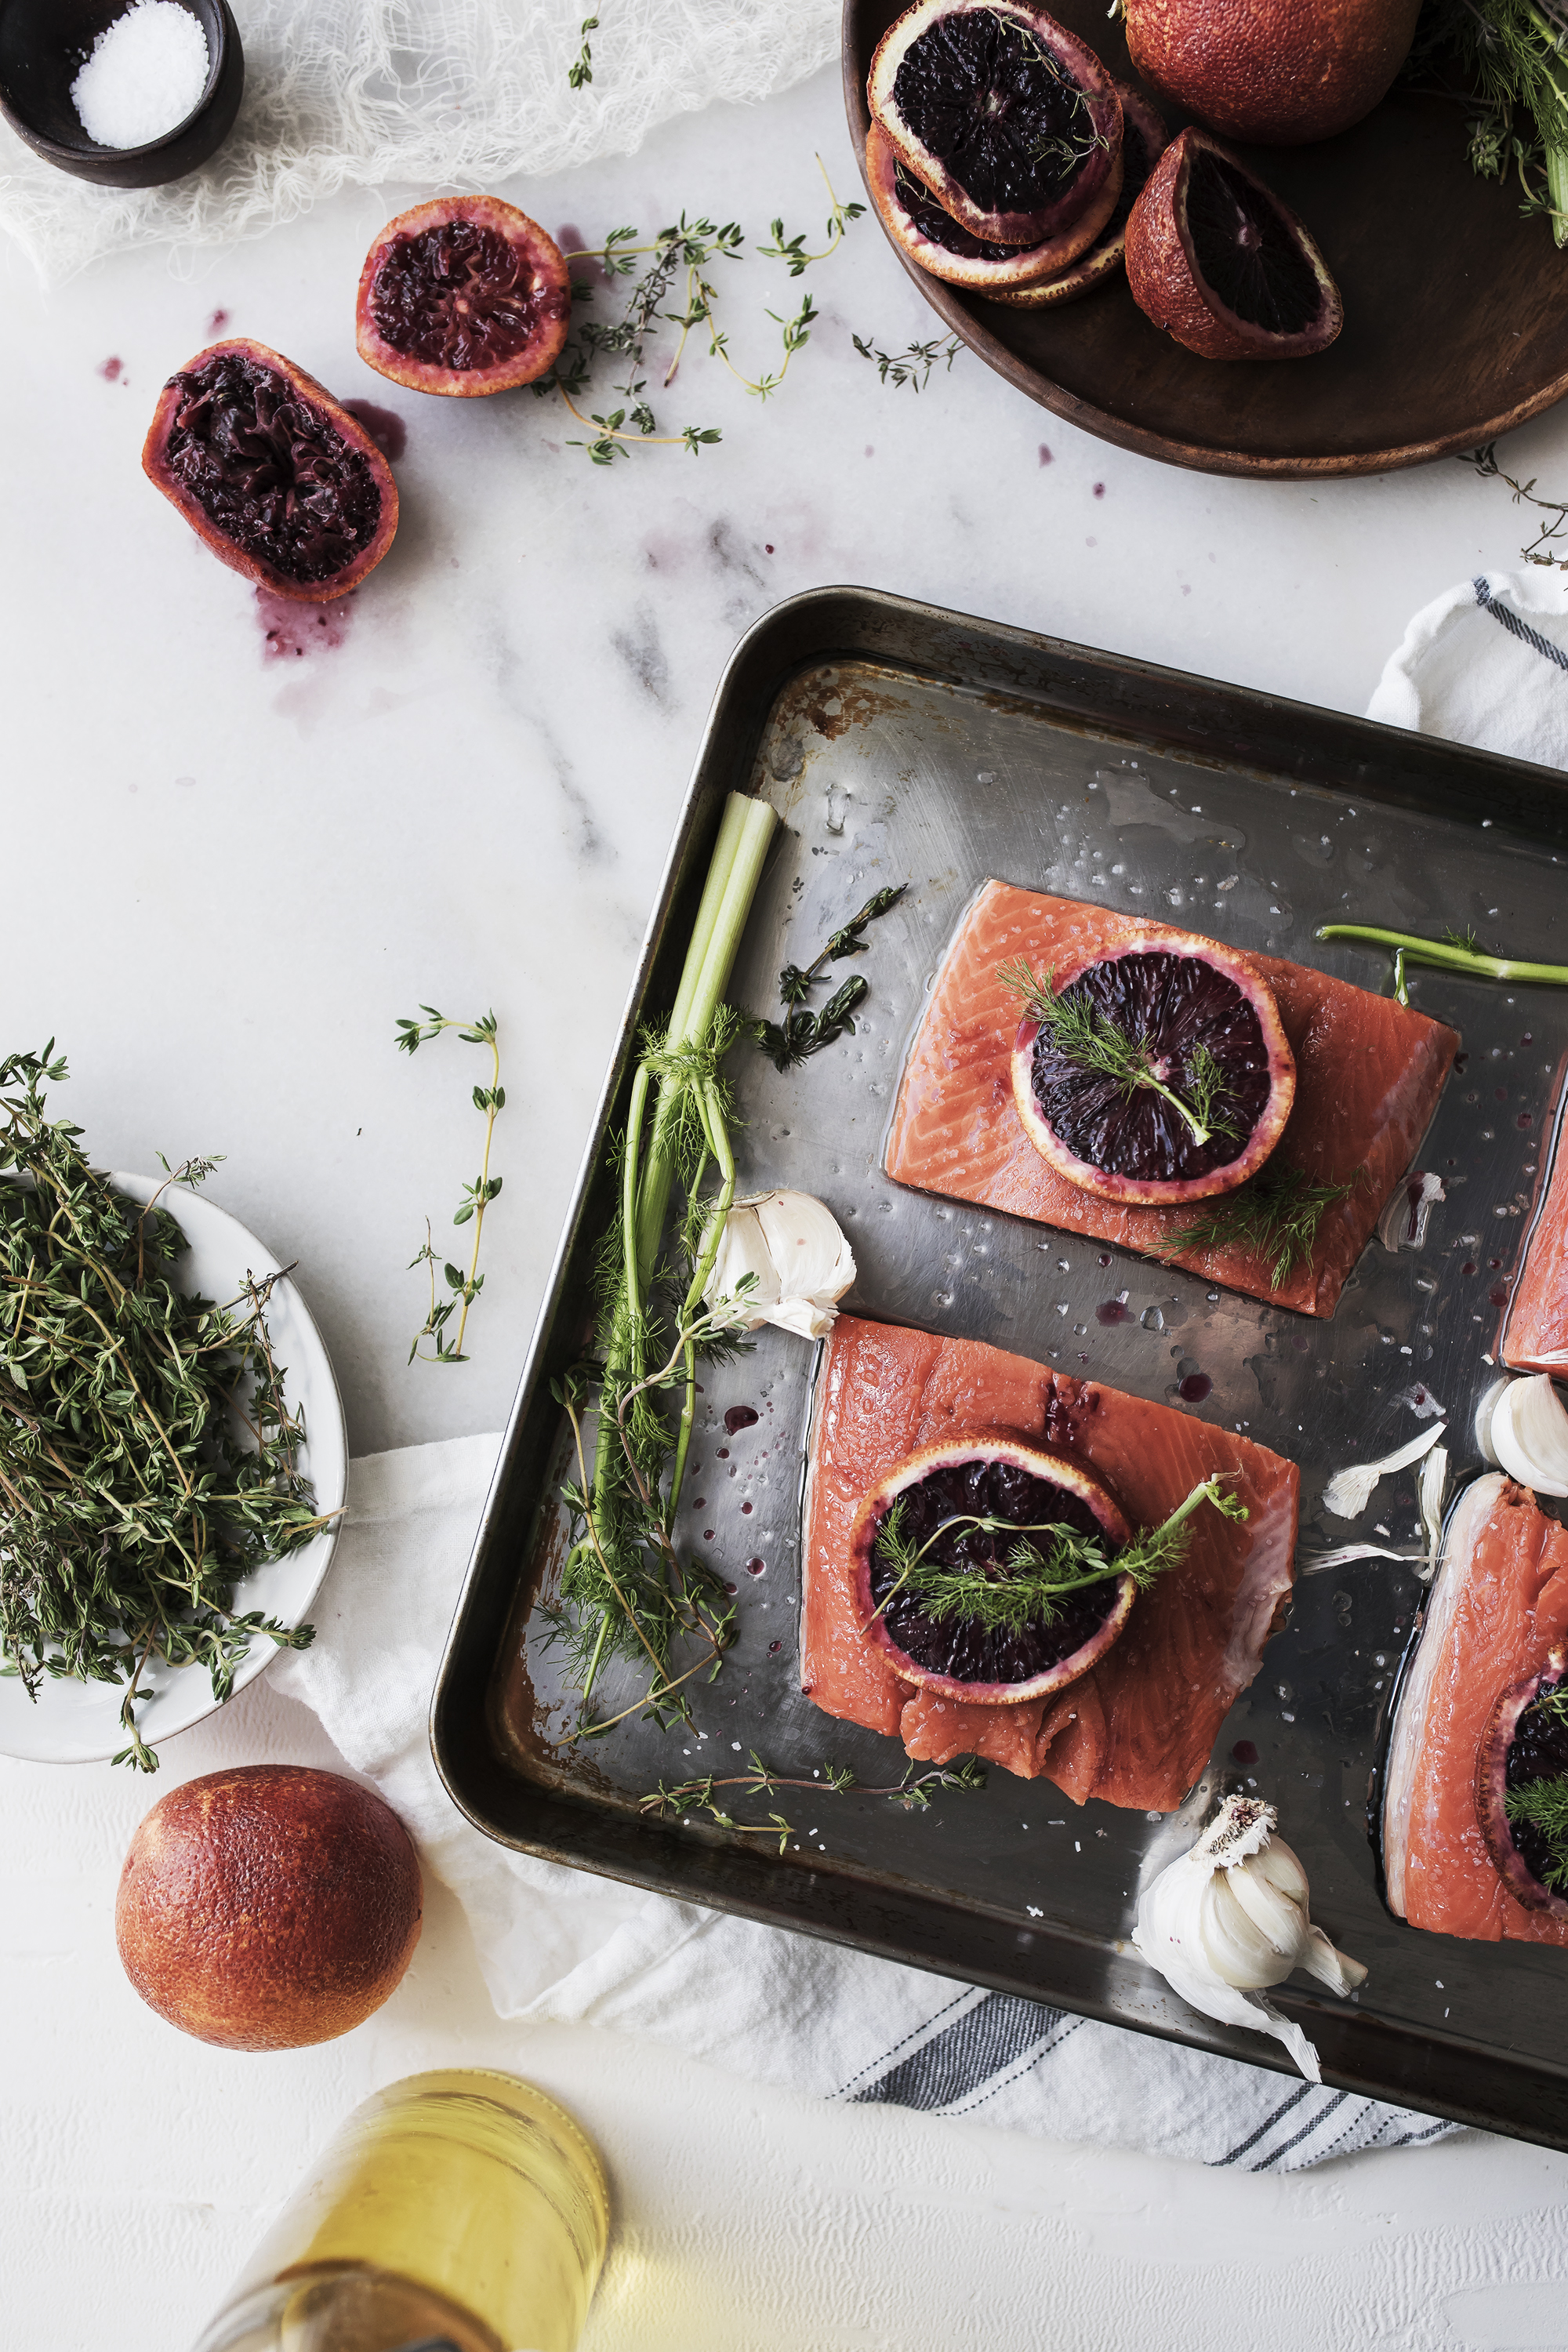
4-6 WILD ALASKAN SALMON Fillets (please no farmed fish)
1 bulb of fresh fennel
2 blood oranges
2 full garlic bulbs
Pink Salt + Fresh Ground Pepper
MCT OIL

COOKING TOOLS: oven, Non-toxic metal sheet pan, paper towels and prep plate, chef knife and cutting board.

Directions:

1.PREHEAT the Oven to 325 degrees.
2.Grab your prep plate, take 2 sheets of paper towels and place on the plate. Gently, clean your salmon fillets, pat dry and place on top of the paper towels.
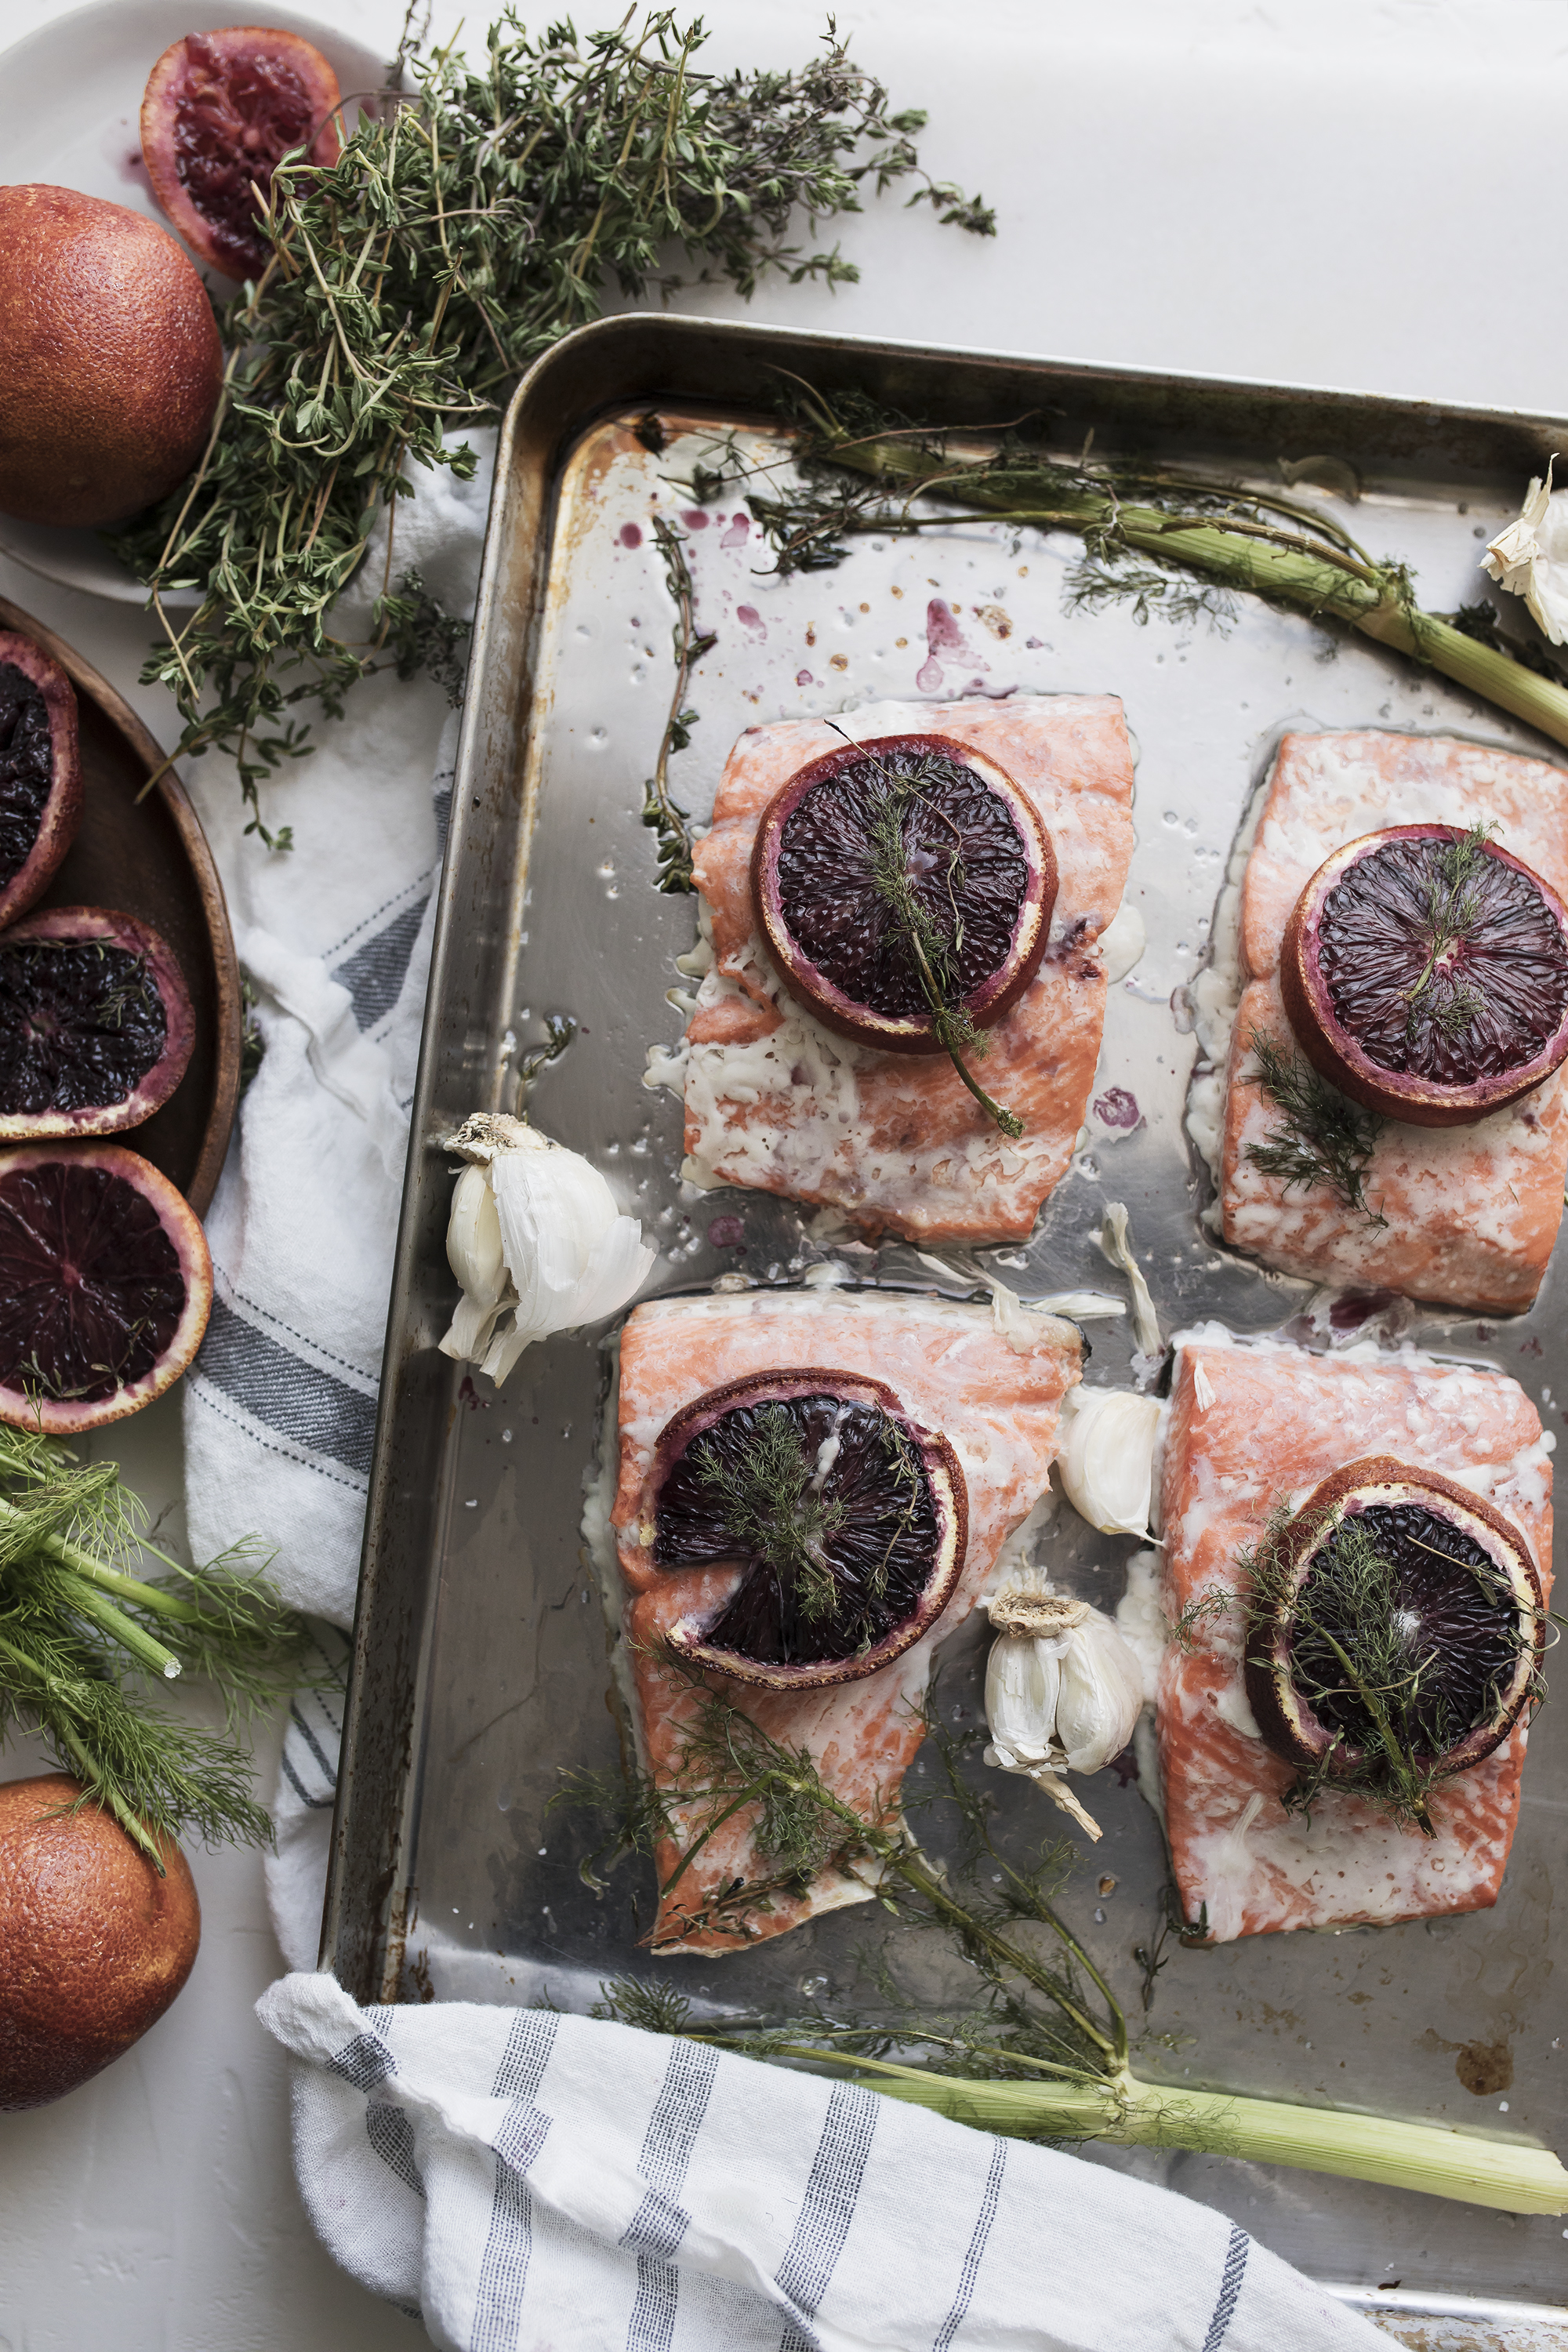
3.While they hang out slice your blood oranges, and cut the end of your bulb of fennel off. Set Aside. (TIP:The bulb can be cut up and eaten or saved for later.) Once dried place your salmon fillets on top of the sheet pan, drizzle with MCT OIL. Sprinkle Pink salt + Fresh ground pepper on top. Place one slice of Blood orange on each fillet. Then gently pick apart the fennel and place on top of the orange. Take the remainder of the Fennel and place next to the Salmon. Last, take your bulb of garlic and place on the pan. (You can break it apart a little too. )

4.Bake for 15-20 min. It's done when SALMONS flakes to touch of fork in the thickest part of the fillet.

TIPS: If you can’t afford wild alaskan salmon, you can replace it with mahi mahi, wild cod or anything for that matter. To Serve the salmon with a summer salad, white rice, or even boiled potatoes topped with butter. Our favorite way to have it is paired with seaweed and white rice! Enjoy!

-Cheers Nicole x


BAKED SALMON RECIPE 1 small.jpg


VANILLA DAIRY FREE ICE CREAM RECIPE || TOPPED WITH FIGS AND RAW HONEY || NICOLE LEE FOOD PHOTOGRAPHER


VANILLA FIG ICE CREAM small 2.jpg


Confession,I have a deep love affair with making Ice Cream. Anybody with me?? There is something romantic in the cooking process, therapeutic even. Melting the sugar and vanilla into the coconut milk, watching it do a beautiful dance together, going from two forms into one. When I’m cooking I find myself grounded, in the most natural way. This thing takes over, becoming present in the moment, I’d like to call it Being.

There are times I’d find myself rushing the cooking process. Whatever dish I’d be attempting to cook, didn’t turn out good at ALL. The flavors were off, something was BURNED! What I noticed is BEING is the KEY to becoming a great COOK. If you’re busy doing other things, or your mind is wrapped in endless thoughts during the cooking process, Or you RUSH through it. You bet it will translate into the food. You can taste your anger, and wandering mind, and definitely the burn toast.  I started noticing there was more to cooking than only doing the motions, you have to FEEL it.

Think of cooking like an intimate dance, or making love. Take it slow, feel each ingredient, smell it, and move with the process, MOVE WITH THE FOOD. Turn off all distractions. Focus on cooking ONE thing and nothing else.You don’t want to rush the process, EMBRACE it. Embrace the mess ups to, because we don’t always get it right the first time. When that comes up brush it off, and KEEP GOING.  

Let’s go make some creamy Vanilla Ice cream!

-Nicole xox


DAIRY FREE ICE CREAM RECIPE, Topped with honey and fresh figs.

INGREDIENTS:**

4 cans full Fat organic coconut milk
2 whole pasture eggs PLUS **5 egg yolks **
4 tablespoons MCT Oil 1/2 cup raw sugar or SWERVE ( alternative sugar)
1-tablespoon vanilla paste or Vanilla extract works great
1-2 whole Vanilla Beans

TOOLS: 1 pot (dutch oven), whisk and an ice cream maker)

NOTE: PREP your cans of coconut in the refrigerator upside down overnight! Before you make the next day!

DIRECTIONS:

1.SEE ABOVE NOTE

2.Slice your vanilla beans in half, and with your knife blade scrape out the paste, put in small dish. Set aside. Next, open the cans of coconut milk and separate the fat and liquid. (You can save the liquid for another project, such as coconut water.) Put your pot on the stovetop and set on low heat. Add in the coconut milk, sugar, vanilla paste and beans to the pot. Whisk together until you see chunks of coconut dissolve. Cool liquid to room temperature, and set aside.

TIP: It’s key you keep your liquid warm and DO NOT boil. ( If it boils, take off heat and pop in the freezer for 20 min)

3.In another bowl, whisk together the whole eggs and yolks until light and fluffy. Add into the coconut mixture. Gently whisk again. Then place the bowl in the freezer for about an hour.

4.Once the mixture is cooled put it into the ice cream maker and follow your machines directions. About mid way through of churning add in your chocolate chips, or fresh chopped chocolate pieces berries or whatever you desire. If you keep this vanilla, serve with figs, and raw honey on top. Store in ice cream containers, or a loaf pan lined with parchment paper. The ice cream should make about 2 quarts.


MESSY BEAUTIFUL || FINDING THE BEAUTY IN LIFE || GUACAMOLE RECIPE || NICOLE LEE


The last few months have been rocky, up down, and all the IN-BETWEEN. Personal bumps, health bumps, career bumps. I found myself wondering where do I want to take this little blog, my career, what do I really want to be spending my time creating? ULTIMATELY, asking myself what do YOU really want?

I came to the “aha” moment that I was Struggling with perfectionism in my life, and in my business. Actually made it easier to mood forward. I know I have talked about this before, about how FACING your ANXIETY, FEAR or thing you are trying to PUSH DOWN will ACTUALLY give you the Answers, and ultimately calm it down. PERFECTIONISM will drive YOU MAD. IT makes you freeze, fear takes over and you serve no one, not even yourself when you are in that place.  

Somewhere inside I got the courage to ask the universe for some answers. Show me something, anything!!! (Universe, show me some FUCKING SIGNS.) The answer that came SMACKING me in the face was DO MORE of WHAT you are ALREADY doing. STOP caring about it being PERFECT; just EMBRACE the MESSY BEAUTIFUL IN-BETWEEN. Now, this didn’t happen immediately, but within a few weeks more doors kept opening. The beautiful part is it was already THERE. My gut was nudging me in a direction, and I had to JUMP IN and Not LOOK BACK.

For the first time I feel aligned with myself, and what I am putting out there into the world. More of the MESSY BEAUTIFUL; life, food, recipes, love and finding the silver lining, while sharing it with you. Being honest, no bullshit approach. My hope is that I inspire you to do the same. To BE YOU, to eat good food, to find the MESSY BEAUTIFUL MOMENTS and EMBRACE them, LAUGH when you FUCK UP, and keep moving forward. Will you JOIN ME?

NOW, let us go make some guacamole and if you’re real smart you’ll make some Margaritas to go with.

Cheers,

Nicole


Guacamole recipe:

Makes enough for 4-6 people

INGREDIENTS: 4 avocados 1 clove garlic 2 bunches of cilantro 1 jalapeno 3-4 limes MCT OIL SPICES: Paprika Oregano Salt Pepper

TOOLS: Large bowl or large mortar and pestle Small bowl Chef’s Knife Spoon Fork Lime juicer Cutting board

DIRECTIONS:

STEP 1: prep all the ingredients. Starting with the cilantro, pull the leaves off the bunch and gently chop it. You’ll want to do one whole bunch. This should come out to about ½ cup to 1 cup. Put in a small bowl Set aside. TIP: place a damp paper towel over the fresh chopped cilantro. Roughly chop your clove of garlic. Set aside. Half and de-seed the jalapeno. You choose how spicy you’d like it to be by the amount of seeds you’ll be adding. I like it spicy so I’ll add about 1 half of the jalapeno, de seed the other but keep the pepper and chop it all up to add to the guacamole.

STEP 2: With your chef knife half your avocados and de-pit them, scoop them out with a spoon and place in the large bowl or mortar and pestle.

STEP 3: Add in all the cilantro, jalapeno, and garlic to the bowl of avocados. Then add; 1 spoon of paprika, 1 tsp. of oregano, 1 tablespoon of MCT oil, salt and pepper to taste. Squeeze 1 whole lime over the bowl. (Don’t mix yet)

STEP 4: Squeeze one lime over the avocado mix. Now start to mix with fork, or your mortar and pestle. Either works. Gently do this until you’ve got the avocados crushed, and it’s all mixed together. Next,TASTE! If it’s too fatty add one more half of lime, if its bland add salt. This is where you get to make the MAGIC.

STEP 5: ENJOY. Serve with chips, crackers, margaritas. You name it.


GLUTEN FREE CHOCOLATE CHIP COOKIE RECIPE || FOOD PHOTOGRAPHER NICOLE LEE


CHOCOLATE CHIP COOKIE RECIPE 1small.jpg

Who doesn’t love CHOCOLATE? I’ve got the perfect cookie for you, with a low glycemic index you won’t feel a crash. And still get to ENJOY your CHOCOLATE! Recipe below!

Tell me what YOU THINK, Or tag me in your BAKING ADVENTURES!

CHEERS + LOVE,

Nicole


GLUTEN FREE CHOCOLATE CHIP COOKIE RECIPE

INGREDIENTS:

  • 1 cup vegan butter, or mix of avocado + Olive oil
  • 3/4 cup maple syrup
  • 2/3 cup swerve alternate sugar
  • 2 pasture eggs
  • 2 1/4 cups @bobsredmill GF all purpose baking flour
  • 1 teaspoon baking soda
  • 1 teaspoon sea salt
  • 1 bag 85 % chocolate chips
  • 1 tablespoon vanilla

DIRECTIONS: In large bowl pour all liquid ingredients, mix. Then add one egg at time. Mix again, Set aside.

In a separate bowl measure out dry ingredients, then add to wet ingredients. Add in chocolate chips. Mix together, if dough seems wet, add 1 tablespoon of flour mix and repeat.

Store in fridge for 1 hour to up to 24 hours. Then Bake. At 350 degrees for 15 min, let cool and enjoy!


CHOCOALTE CHIP COOKIE RECIPE 5small.jpg

GF CHOCOLATE CHIP COOKIE RECIPE 6small.jpg

GF CHOCOLATE CHIP COOKIE RECIPE 4small.jpg


SAY HELLO! (fill out form below!)


"POP UP" WORKSHOP with WEST ELM PHX || FOOD + LIFESTYLE PHOTOGRAPHER NICOLE LEE


Hello Friends, 

Come hang next week! Details below,

-Cheers, xx Nicole

PS FILL OUT THE FORM BELOW IF YOU'D LIKE TO ATTEND! 


We’ll bring the drinks! 

Come join us for an evening of messy fun. We've partnered with West Elm PHX  to host a “POP UP” Workshop. We'll be preparing a simple dish, style food scenes, photograph and edit beautiful shots with our IPHONES. 


 March 8th, 2018
  4pm-6:30pm

         West Elm PHOENIX        
Cost: $25

We'll be learning;
IPHONE Photography   
                               Styling Tips + Tricks
                                
                                                                                                                                                                                            
 BONUSES;
PDF Guide of recipes, IPHONE photography + editing,
Styling + Prop TIPS! 
Swag bag + Potted Succulent   
                                    
Bubbly drinks + food to nibble on during the event!                                                               

Number of spaces are limited so Grab your seat! 


GUACAMOLE 2small*.jpg


EASY DIY VALENTINES BOX | RECIPE || PHOTOGRAPHER NICOLE LEE ||


Hello friends,

Homework is torture, yes. Why they do it, and why we want them to stop is for another post. Embracing it is half the battle. (having a good attitude yourself doesn’t hurt either). Doing homework with your kids can be fun. Let it be fun. When we got this weeks drill it included making valentines boxes for valentines day. Which means we have two choices, one: bitch and moan or two: EMBRACE IT. We looked at it as an opportunity to hang with the kids and get some extra art in. We blasted some music, stuffed our faces with guacamole, made the Valentines Boxes and had a HELL of a TIME!

Cheers

-Nicole


EASY DIY VALENTINES BOX

EASY DIY VALENTINES BOXES:

SUPPLIES:

OLD SHOE BOXES
MOD PODGE MATT FINISH
PAINT BRUSH
COLORFUL TISSUE PAPER
GLITTER
PAINTS
PENS
TAPE

ADDITIONAL THINGS TO CONSIDER, FOR HAVING A GOOD TIME:

YOUR FAVORITE MUSIC KIDS (OR NO KIDS)
YOUR FAVORITE SNACKS, HIGHLY RECCOMMENTED : POPCORN + QUACAMOLE

DIRECTIONS:

TAKE ONE PIECE OF YOUR COLORFUL TISSUE PAPER FACE THAT DOWN ON THE TABLE ( THE COLOR SIDE DOWN) PLACE YOUR BOX IN THE MIDDLE.WITH YOUR PAINT BRUSH, DIP IT INTO THE MOD PODGE SPREAD AN EVEN COAT OVER YOUR CARDBOARD BOX BOTTOM, PLACE THAT ONTO THE TISSUE PAPER, (SEE UBOVE FOR EXAMPLE IN PHOTO) THEN GIVE THE BOTTOM A GOOD PAT WITH YOUR HAND TO SMOOTH THE BUMBS OUT. THEN DO THE SAME TO ALL THE SIDES. IT DOESNT HAVE TO BE PERFECT JUST GET THEM TO STICK, AND THEN ONCE THATS DONE, PUT ANOTHER COAT OF MOD PODGE OVER THE WHOLE BOX AND GET IT NICE AND COATED! IF YOU LIKE SPARKELS ADD THE GLITTER! LET DRY FOR 1 HOUR - TWO HOURS. YOU CAN MAKE YOUR SLIT FOR THE LETTERS ONCE DRY.

NOTE: THIS IS SOMETHING THE KIDS CAN DO, SO GET A BOX FOR YOURSELF AND SHOW THEM HOW ITS DONE, OR DO IT AT THE SAME TIME AND GUIDE THEM, ONCE THEY HAVE THE HANG OF IT THEY CAN EASILY TO IT THEMSELFS. THE KEY HERE IS NOT PERFECTION, ITS FUN! LET THEM GET INTO IT.

ONCE DRY YOU CAN FILL IT WITH YOUR VALENTINES CARDS!


EASY DIY VALENTINE BOX 10.jpg

EASY DIY VALENTINES BOX

EASY DIY VALENTINES BOX 12.jpg

EASY DIY VALENTINES BOXES

EASY DIY VALENTINES BOX


EASY DIY VALENTINES BOX

EASY DIY VALENTINES BOX

EASY DIY VALENTINE BOX

WHERE TO PURCHASE SUPPLIES:

TARGET

IKEA

SNACKS : TRADER JOES

WHOLE FOODS


FEAR, IT'S A FUNNY THING || PERSONAL GROWTH STORIES || FACING ANXIETY|| PHOTOGRAPHER NICOLE LEE

“As you come to recognize the power of consciousness, that what is behind your eyes, so to speak, holds more power than what appears in front of them, your inner and outer perceptions change.” – Gary Zukav

This past year has had its fair share of ups and downs and in between, my health took to an all time low, and for some reason I decided to start caring what other people thought. I became frozen. Frozen in what to say, how to be myself, what to articulate, and WHAT am I bringing to my business? You get the idea. Obsessing about where the line is on sharing was the main focus. To share or not sharing on social media? Sharing too much of your personal life, may leave you feeling vulnerable and exposed. Or not sharing enough may lead to feeling like a phony only sharing the “highlight reel”. I found myself looking at what all these “influencers” were/ are doing and thinking well f*** I am never going to “catch up”. Do I even have anything to offer? Am I good enough? Do people care anyway?

FLOWERS

Not great self talk eh? I had it all wrong.

When I came to the realization that I cared WAY too much and put so much energy into caring what other people thought, I felt mentally exhausted and anxious. I turned to my therapist for help, I told her what was going on, expressing I felt I may have some unresolved social anxiety that I need to face. It comes up at social events, and if I’m really being honest, I feel that way most times before posting on social media channels.

Her response “ she once felt the same way (minus the social media part) and someone informed her that getting caught up in what others think is self absorbed. “SHUT UP!” I thought. The last thing I want is to feed narcissism and be self-absorbed! I gave myself a good hard look into the mirror and said can we move on? Is putting energy into what other people think really worth your time? Is it honestly helping you move forward in life? HELL NO.

Moving forward was simple to do. Truth, it's going to come up again, when it does we have a choice. Fear goes away when you go look at it. The fear gets bigger when you push it aside. It was facing the fear that got me to the other side.

Looking back I can laugh at myself. I wasted so much time on things that only held me back from my own truth. Lesson learned. In fact most people may not have this as an issue. Maybe their fears lie somewhere else, starting that project, launching that business, getting out of the chair to have a good time, trying something new outside of your comfort zone. Whatever it is for you, once you become aware, awake, conscious you have a choice. Using the new tool to look at your fears, face them, figure out what’s up, or run and hide from them, push them down, or drop out. The only one in the way of you is yourself. So the choice is yours.

Cheers, X Nicole


HELPFUL LINKS + TIPS :

JUDGMENT DETOX

 SUPER SOUL SUNDAY, OPRAH

You cannot become compassionate with yourself without becoming compassionate with others, or with others, your world becomes compassionate. You draw to yourself other souls of like frequency, and with them you create, through your intentions and your actions and your interactions, a compassionate world.  –Gary Zukav


QUICK EASY HOLIDAY PARTY SNACKS || GLUTEN FREE + VEGAN RECIPES || FOOD PHOTOGRAPHER NICOLE LEE


CHEX MUDDY BUDDIE RECIPE

Hello Friends, 

We are in the home stretch of the holiday Season. I don’t know about you folks, but it seems this year has been extra busy. Between all the kids Parties, Family parties, and Christmas, and upcoming New Year's, I may take the rest of January to hibernate. Anyone with me?

Before we decide on that, I’ve got the easiest recipe for you to make. These “muddy buddies” and I go way back. When I started making these I couldn’t even boil and egg, or so much as make a batch of cookies without burning the entire batch. What I'm saying is anyone can make them! This recipe is for the “ultimate home cook” or the people who may not have a clue what they are doing in the kitchen. Recipe is below, Happy Cooking!

-Nicole


GLUTEN FREE + VEGAN CHEX MUDDY BUDDIES RECIPE:

What you will need : 1 family size box Rice Chex Cereal

1 bag of 85% organic dark chocolate chips

¼ cup MCT OIL

1 teaspoon Organic Vanilla extract

½ cup Organic Peanut Butter ( or if allergic omit entirely, add ¼ cup more MCT oil, or ALTERNATIVE NUT BUTTER)

½ cups of Swerve Confectioners Sugar

1 cup Organic Powdered Sugar

1 LARGE saucepan (large enough to mix in 10 cups Chex Cereal)

2 large ziploc gallon bags Or 2 Large Paper grocery bags (for mixing and shaking)

TIP: IF you are looking for the low glycemic version, swap out ALL POWDERED sugar for SWERVE CONFECTIONERS Sugar, it’s one to one ratio. I like to do about half and half.

Directions:

Measure out 10 cups of the rice Chex cereal set aside. In your bag place half of the powdered sugar set aside. Measure out your nut butter, oil, and vanilla. Set aside.

Heat your dutch oven to medium low, pour in your MCT OIL, NUT BUTTER, vanilla and chocolate chips stir with wooden spoon or spatula until all the chips melt, do not stop stirring, it can burn quick. Once Melted TAKE OFF HEAT! Still at the stove pour in your cereal to the melted chocolate , mix until all are coated with chocolate mixture. Then add the mix to your bag filled with the powdered sugar, once in add some more powdered sugar on top of mix, seal and shake shake shake until all coated. If the mixture seems wet, add in 1 tablespoon of powdered sugar, shake again and repeat until it's coated with the powdered sugar. Since we are using all real ingredients, the color may come dark instead of all white, don’t be alarmed. When finished shaking, transfer to parchment or wax paper to cool. Then enjoy!


MUDDY BUDDIES 3small*.jpg

THIS RECIPE WAS ADAPTED FROM CHEX MUDDY BUDDIES

EASY LEFT OVER CHICKEN SOUP RECIPE || FOOD PHOTOGRAPHER NICOLE LEE


CHICKEN SOUP


Hello Friends,

Sometimes the best recipes stem from only what is stocked in the fridge at the moment. You know, when it gets bare and you can’t bring yourself to do another weekly shop. As my kids are growing it seems I am constantly running out of food! So we barely have leftovers, but I do have staple ingredients lying around. Garlic, ginger root, onions, carrots, celery, fresh herbs, always cilantro and basil. In the pantry, canned beans, tomatoes, chicken bone broth and veggie broth stock the shelves. That way when I am in a pinch, I can easily throw something in a pot and walk away, while I  to tend to the chaos of after school activities. Inspired by the classic the many leftovers in the fridge after hosting our first “classic” thanksgiving meal a beautiful hearty soup was born.


Leftover Chicken Soup Recipe

Ingredients:

2 cooked Cornish Hens (or 1 fully roasted chicken)

2 sweet onions

4 celery stalks

2 carrots (I used my roasted carrots from the night before!)

2 cloves garlic

Fresh Ginger (about half the size of your pinky finger)

2 - 16 oz chicken bone broth (free range organic is my preference, I like Pacific Brand or you can make your own stock) White wine (you actually like to drink, I love Sauvignon blanc)

2 cans of cannellini beans (eden brand is great, they pressure cook and Soak them, so they are great on your digestive system)

2 -3 cups of fully cooked mixed potatoes, Japanese sweet, white, red… you get it! (roasted from night before, or boiled then add them to the pot, don’t add raw potatoes to your soup, it will soak up all your broth)

Herbs:

1 bay leaf

fennel leaves

fresh oregano, thyme leaves, sage, rosemary

Salt

Fresh ground pepper

Other things you may need:

Olive Oil, or avocado oil for frying your veg

1 large stock pot, with wide bottom (Dutch oven work great too)

1 wooden spoon

Chef’s knife

Cutting board

Directions:

First chop all your onions, carrots, celery, place in one bowl set aside. Take two garlic cloves with the peel on, place one on your board and with your knife smash down, take off the peel and set aside the garlic. Repeat.

Place your stock pot on the stove, turn on the stove to medium-high heat add in your Avocado oil, when its good and hot add in your onion carrots and celery mixture to the stock pot. Then add in salt and pepper to taste, (small amounts at a time here if you aren’t experienced). Add in your whole garlic. Then Add in ½ cup of wine while the pot is good and hot, then bring the stove down to medium heat. Cook until the onions are clear, then add in both smashed garlic cloves. While that is making magic, roughly chop your herbs and add those to the pot. If things are good and cooked, turn the heat to low.

TIP: Be sure to stir your saute every few min so it will not burn, I like to feel things out when cooking, smell also helps so be sure to use your senses as a guide in the process!

Pull apart the chicken meat and bones, add them to the pot, and set aside the carcass for other use or discard altogether.

Open your cannellini beans, thoroughly rinse and drain beans and put them in the pot. Add in the fully cooked potatoes from last night's roast, ( or pre boiled potatoes). Cut about 1 inch long of fresh ginger root, toss this into the pot whole. Add in your Bay leaf as well.

Give everything a good stir, turn your heat up to high, now it’s time to to add in the bone broth to the stock pot. Let it boil for 5 min on high, when you see it bubbling, give it a good stir and bring your heat down to low and let simmer for min of 45 min - 12 hours depending on when you will be eating. The longer it sits the more time the flavors have to melt into each other. After the 45 min on low heat, you can taste if it needs more herbs, salt or pepper.

Serve with crusty bread and salad to make a glorious dinner!

Cheers

-Nicole