AVOCADO TOAST WITH RADISH, CILANTRO + LIME | GLUTEN FREE | ARIZONA FOOD PHOTOGRAPHER Nicole Lee


Hello Friends, 

I’m tattling on myself to you that, we’ve had domino's pizza night one to many times these last 6 weeks. I know no big deal, BUT when it comes to home cooked meals I pride myself on them. I’m still learning the art of FOOD is FOOD, and enjoy that vs lets beat ourselves up for eating take out. Also, when you have sports that fill up six days of our week, sometimes take out is the “easiest” thing.

This year, I made a little promise to myself that I would get better at meal prep during these sports seasons. My weakness is I’m not a huge fan of the insta pot, or sitting there on a Sunday chopping all the veg for the week, or obsessively planning a meal list. Instead, I like to stock my cabinets and fridge with items I know I can whip up quickly. For instance, having a hardy sourdough bread on hand, fresh veggies, canned beans, tomatoes and even a pre-canned tomato sauce. Another thing I love is big batch cooking, which would be doubling or even tripling a recipe, that I can freeze or we eat later in the week. 

I’m still learning this whole kids in sports “juggle”, so we’ve got those “not so perfect” meal weeks in there and that's okay too!

When nights get late and I don’t order takeout, we’ll have “snack dinner” which includes, some sort of hummus and veg. Avocado toast, maybe even through a fried egg on top for good measure. It's simple and easy when you get home at 7:30 at night, feel me? 

Now, let's make some toast. 

Cheers friends,

Nicole 


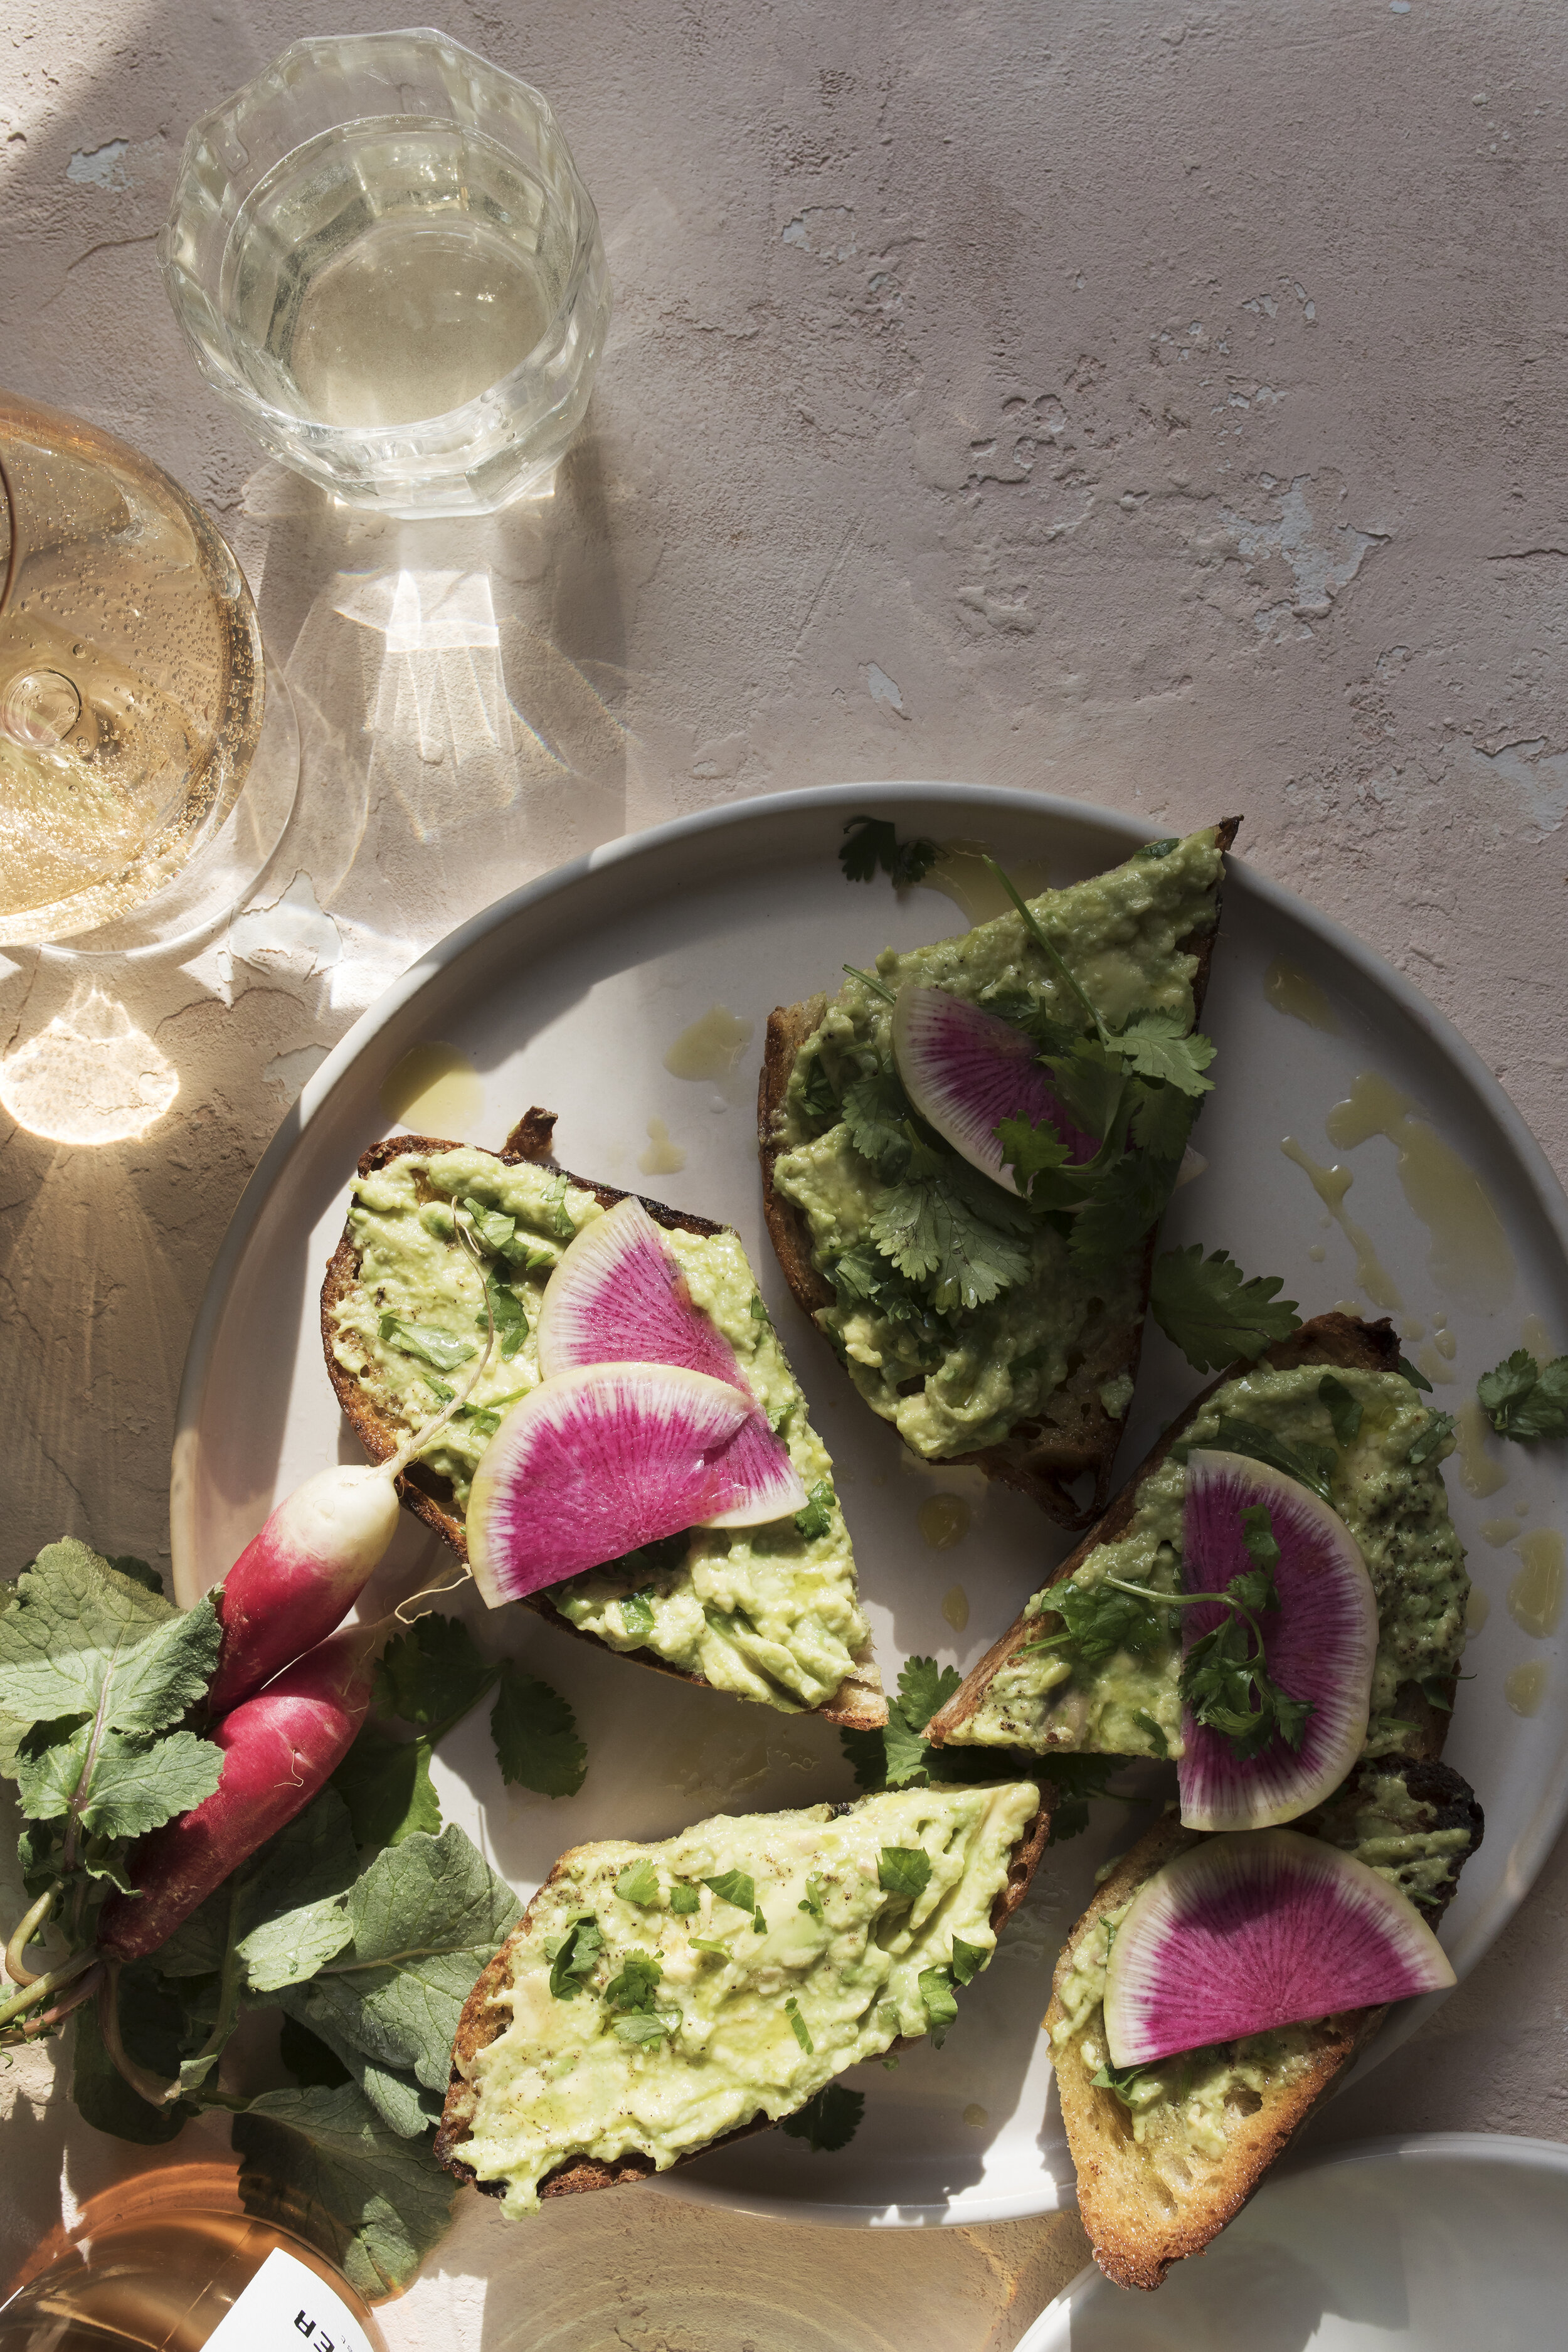
Yet Another “AVOCADO TOAST” with radish, cilantro, lime and garlic (if you dare) RECIPE**

Ingredients :

  • 1 loaf of your favorite bread
  • 4 ripe enough avocados
  • 1 bunch of cilantro
  • 2 limes
  • 1 bunch baby radish
  • 1 bunch of watermelon radish
  • 1 tablespoon MCT OIL
  • Good quality Extra Virgin Olive oil for toast ( as needed)
  • Kosher Salt
  • Crushed red Pepper flakes
  • Pepper

Other items you’ll need: Large bowl to mash avocados, fork, toaster or oven.

DIRECTIONS:

  1. With a chef knife slice your avocado in half, stab the middle of the pit of the avocado with your knife and slowly twist the pit, it should come right out. With a spoon, spoon out both sides of the avocado into your bowl. Repeat this step with all of your avocados. Slice and squeeze 1 half of lime into your bowl. Add the MCT oil. Mix around a bit. Roughly chop your cilantro, excluding the stems, add about 2 tablespoons to your bowl. Set aside rest in case you’d like it.
  2. Thinly slice your garlic clove. Add to the bowl. Then with your fork mash your avocado mixture, add the salt and pepper to taste. This is the part where you can get creative, if you like more lime add it, or cilantro, even the garlic. Just be sure to taste before adding each ingredient.
  3. Prepare your radish, clean and remove the leaves. Which if you’d like to keep them wash and chop them to add to your toast later. Thinly slice both the red radish and watermelon.
  4. Make your toast. I like to heat the oven to 400 degrees and put all the toast on a large sheet pan, or you can toast using a toaster.
  5. When toast finishes, spread an even amount of olive oil all over the toasts. Then a good helping of your avocado mixture. Top with radish and a pinch of salt, and sprinkle of EVOO if desired.
  6. Enjoy.


SAVERY TOMATO GALETTE RECIPE | GLUTEN + DAIRY FREE | BY NICOLE LEE


Hi Friends,

This summer I’ve been obsessed with experimenting with baking in the kitchen. I’ve also been cooking my way through several cookbooks and having a blast doing it. Not to say there hasn’t been some mishaps but we won’t go into those today. 

Xo

Nicole


galette recipe gluten free tomato

SAVORY TOMATO GALETTE RECIPE | INSPIRED BY RECIPE IN BON APPETIT MAG

HOT TIPS: PIE DOUGH can be made up to 2 hours to 2 days ahead of this recipe. Make Recipe when you have some time, it's great for SUNDAY AFTERNOONS,OR WEEKENDS. If you're pressed for time buy pre-made pie dough. Because we aren’t all bakers and there is nothing wrong with buying PRE-MADE DOUGH.

PIE TART DOUGH INGREDIENTS:

2 cups gluten free brown rice flour
¼ cup potato starch
¼ cup tapioca starch
2 Tbsp coconut sugar
1 tsp kosher salt
1 cup vegan cashew butter (cold cut into cubes)
4 Tbsp unsweetened cold almond milk

PIE DOUGH ADAPTED FROM ARAN GOYOAGA

FILLING INGREDIENTS:

2lbs heirloom tomatoes sliced ¼” thick
3 garlic cloves, thinly sliced
1 bunch of fresh thyme
1 large egg beaten
Good quality extra virgin olive oil
5 oz mixture of finely grated hard cheese combo (Pecorino Romano, manchego, and sharp grass fed cheddar such as dubliner) or any hard cheese that sounds good!
½ lemon zest / 1 squeeze of fresh lemon juice
1 tsp salt
Bunch of fresh basil

OTHER INGREDIENTS: Parchment Paper Non-stick spray 1 large sheet pan

DIRECTIONS FOR PIE TART DOUGH: NOTE: PIE DOUGH MUST BE MADE 1 HOUR AHEAD

  1. Place your cold cashew butter into the freezer for a min while you measure out all of your dry ingredients.

  2. In a large bowl place your dry ingredients. In a seperate cup add a few ice cubes to the unsweetened almond milk to keep it cold.

  3. With your hands gently mix the cashew butter and dry ingredients together until grainy. Add your almond milk and mix together until dough forms. Gently knead together ensuring not to over work. If it feels wet, add 1 tsp of gf flour to the mix, if feels dry add 1 tbsp of more of cold milk.

  4. When the dough forms, pop some plastic wrap over it and refrigerate for min of 1 hour. NO Cheating here!

GALETTE DIRECTIONS:

  1. Preheat oven to 400 degrees f. In a bowl, place your salt and pick off about 1 tsp thyme. With your fingers take your 1 tsp salt and combine with thyme to make a paste. Then add garlic and mix with figures more. Add in your tomatoes and toss together. Let sit for 5 min, while the tomatoes release some liquid.
  2. Drain the tomatoes with strainer, and lay flat onto paper towel.
  3. Grab your dough, unwrap.
  4. Get a large sheet pan and spray with nonstick spray.
  5. Measure out parchment paper to fit your sheet pan, place on COUNTER (not on pan). Lightly dust with flour. Place another sheet of parchment paper over the dough and GENTLY roll out into a round shape. If it falls apart (stay calm) and gently sprinkle water or almond milk over the dough until it combines. It should be easy to roll out, but still be gentle.IT DOESN’T HAVE TO BE PERFECT. WONKY IS OKAY, THAT'S why they call it a galette!!
  6. When it looks even in shape place your finely grated cheese in the middle leaving 1 ½ inch of dough border.
  7. Add your tomatoes and garlic mixture over cheese. Bring the edges of the dough over the filling using your parchment paper to guide it over. NOTE: SINCE this is GLUTEN FREE you have to be EXTRA GENTLE, pretend you are handling a newborn baby!
  8. Crack your egg, and whisk with fork in bowl, blend in 1 tsp flaky salt. With a brush wash it over the edges of the dough (not tomatoes). Then POP in FREEZER for 5-10 min. (Basically depending on how patient you are!) After it’s done, take a bunch of fresh thyme and place in the middle of galette or on the edge of the baking sheet.
  9. Bake on bottom rack for 55-60 minutes until golden. Rotating 1 time.
  10. When finished, enjoy with a drizzle of olive oil, fresh basil and grated lemon zest!

ENJOY and HAPPY baking ANY QUESTIONS feel free to send me a message!


galette recipe

summer tomato recipes

gluten free savory galette recipe

GLUTEN FREE AVOCADO TOAST RECIPE || NEW TWIST ON AN OLD CLASSIC || BY NICOLE LEE

AVOCADO SANDWHICH 1small.jpg

Hi Friends,

Another week, another slice of avocado toast. I am my own walking cliche to everything Millennial. I consume coffee like water, eat at least one Avocado a day; mashed, whole, on toast or on crackers, dress like a hipster. You get the idea. So why would I stop eating avocado toast, even if some guy say's millennial's are going broke over it

I’m a true believer that the best recipes are the simplest recipes. Toast some bread, mash some avocado, throw spread on it DONE. You have yourself a gourmet lunch or dinner.. Or anytime kind of meal. So if you want to feel fancy, it doesn’t take much, make some toast! I promise you won’t go wrong. Let's make some toast + happy cooking friends!!

-Cheers,

Nicole


*Avocado Toast with Vegan cream cheese cilantro and lime.


Servings : made to order.. For 1 or can double for more

Ingredients:
2 slices GLUTEN FREE BREAD
2 large Avocados or 3 small ones
1 Kite Hill Vegan cream Cheese (chive flavor is what we used)
1 bunch of fresh cilantro
1 lime
Salt + Pepper
1 tsp Mct oil

Directions:

1.Start by placing all your ingredients on your counter. Get it organized. Slice Your avocado in half, scoop out the avocados with spoon and place in small bowl, mash avocado with a fork + set aside. Next, gently chop your cilantro, slice your lime. Squeeze lime ( about 1-2 tbls) over the avocado, add the cilantro to the same bowl, add salt + pepper to taste. Then add 1-2 tbsp of MCT oil to the avocado mixture. Taste, if it tastes bland, add more salt + pepper, if oily, add one more slice squeezed lime.

NOTE: If don't have MCT OIL - OMIT and DO NOT USE COCONUT OIL it WILL NOT WORK!

2.Toast your bread, while that is going grab a plate. After it finishes, spread the vegan cream cheese on both slices of bread, put your avocado mixture on top and top with cilantro if that’s your jam. Eat open faced and enjoy!


QUICK EASY HOLIDAY PARTY SNACKS || GLUTEN FREE + VEGAN RECIPES || FOOD PHOTOGRAPHER NICOLE LEE


CHEX MUDDY BUDDIE RECIPE

Hello Friends, 

We are in the home stretch of the holiday Season. I don’t know about you folks, but it seems this year has been extra busy. Between all the kids Parties, Family parties, and Christmas, and upcoming New Year's, I may take the rest of January to hibernate. Anyone with me?

Before we decide on that, I’ve got the easiest recipe for you to make. These “muddy buddies” and I go way back. When I started making these I couldn’t even boil and egg, or so much as make a batch of cookies without burning the entire batch. What I'm saying is anyone can make them! This recipe is for the “ultimate home cook” or the people who may not have a clue what they are doing in the kitchen. Recipe is below, Happy Cooking!

-Nicole


GLUTEN FREE + VEGAN CHEX MUDDY BUDDIES RECIPE:

What you will need : 1 family size box Rice Chex Cereal

1 bag of 85% organic dark chocolate chips

¼ cup MCT OIL

1 teaspoon Organic Vanilla extract

½ cup Organic Peanut Butter ( or if allergic omit entirely, add ¼ cup more MCT oil, or ALTERNATIVE NUT BUTTER)

½ cups of Swerve Confectioners Sugar

1 cup Organic Powdered Sugar

1 LARGE saucepan (large enough to mix in 10 cups Chex Cereal)

2 large ziploc gallon bags Or 2 Large Paper grocery bags (for mixing and shaking)

TIP: IF you are looking for the low glycemic version, swap out ALL POWDERED sugar for SWERVE CONFECTIONERS Sugar, it’s one to one ratio. I like to do about half and half.

Directions:

Measure out 10 cups of the rice Chex cereal set aside. In your bag place half of the powdered sugar set aside. Measure out your nut butter, oil, and vanilla. Set aside.

Heat your dutch oven to medium low, pour in your MCT OIL, NUT BUTTER, vanilla and chocolate chips stir with wooden spoon or spatula until all the chips melt, do not stop stirring, it can burn quick. Once Melted TAKE OFF HEAT! Still at the stove pour in your cereal to the melted chocolate , mix until all are coated with chocolate mixture. Then add the mix to your bag filled with the powdered sugar, once in add some more powdered sugar on top of mix, seal and shake shake shake until all coated. If the mixture seems wet, add in 1 tablespoon of powdered sugar, shake again and repeat until it's coated with the powdered sugar. Since we are using all real ingredients, the color may come dark instead of all white, don’t be alarmed. When finished shaking, transfer to parchment or wax paper to cool. Then enjoy!


MUDDY BUDDIES 3small*.jpg

THIS RECIPE WAS ADAPTED FROM CHEX MUDDY BUDDIES

AVOCADO TOAST, WITH FIGS, AND CILANTRO || GLUTEN FREE+VEGAN RECIPE || FOOD + LIFESTYLE PHOTOGRAPHER NICOLE LEE


Hello Friends, 

Cooking with children can be a daunting task to some, but I find once you give them a chance it doesn’t take long for them to fall in love with helping out and be part of the process.  It feels only natural to invite them into what we are doing, whether it be flipping eggs, baking some cookies, or just making a simple toast. I tend to give them jobs like; letting them sprinkle on the salt or herbs, or crack the eggs, stir the pot. They love it, give it a try!  - Cheers, Nicole


Avocado Toast; with figs lime and cilantro recipe :

Ingredients:

-A loaf of gluten free (or none GF) bread

- 1 bunch of ripe avocados

- fig fruit (for the top or side)

-1 lime

- chopped cilantro

- salt, pepper, olive oil

- knife, fork, and bowls for mashing

Method: Cut and pit your avocados, in a bowl mash up avocados leaving them pretty chunky. Slice your limes in half, and squeeze over the avocado.  Chop cilantro, set aside.

Toast your bread to your liking, and drizzle high quality olive oil over the top of them. With a fork take your avocado and smash the rest over the toasted bread. Sprinkle with salt, pepper, and cilantro. Then enjoy!


I would love to hear from you! Just fill out the form below! 


CHECK OUT MORE ON INSTAGRAM : 


Strawberry-Basil and Coconut Popsicle Recipe// Arizona food Photographer Nicole Lee


Hi! Lets start there. I wanted to take a moment and reintroduce myself. I’m Nicole. I am a photographer, home cook, Mother, jack  Jill of all trades kind of girl. Last year, I started pursuing photography full time, I had no idea “what” "where" or "how" I was going to get there. Becoming a Photographer that is. Looking back I was quite the hot mess, sometimes I still feel that way ha. But Over the last 6 months I have found some clarity in it all.

When you first start you have a hundred people chiming in your ear, which I am thankful for. They say words like branding, Marketing, Direction, Specialize, Who are you? What are you, how are you going to be successful? What do you charge? Can you do a headstand, then 100 jumping jacks, and snap a shot of me doing one to?

Then you have doe eyed me, blank faced and speechless…queue the crickets please…

I had no idea how to answer any of those questions. I just thought, well I have a camera, I like to take photographs, I like food, and I like people. It is that simple. (But it wasn’t) So many other creatives make it look so simple, truth is I wasted too much time focusing on how to ‘make it' I missed all the key steps to getting there. I just got in the way of myself! I’m sure you have been there.

Then Last April, I ended up taking the most amazing trip out to Seattle and attended the Survival Guide Workshop, by John Keatly. It saved me. I am not kidding around here folks.

He taught us how to market, do business, charge people properly, become a real sustaining brand, and he taught me how to take a risk, to start putting my feet on those stepping-stones. We also had killer food, and pop quizzes. It’s not your average workshop. Plus, I walked away connecting to some supportive friends, some game changers who being the new girl, and they didn’t stomp all over me, they embraced the underdog.

For the last year, I have been able to put myself out there, gain some confidence, say I’m the girl for you, (or not). I’m getting clear on who I am which; in fact you do need to know if you are a creative. What am I willing to say no and yes to, as well as be humble enough to do the odd jobs while I get my feet off the ground.

So where am I going with all this? Well I am saying, If you are struggling creative, don’t give up, figure out what you need to get better at and find someone, anyone, or you tube how to get from here to there. Second, I’m just so freaking excited that all the little steps are coming together.

Now go make some popsicles!!


Strawberry Coconut Popsicle Recipe


Makes 12 Popsicle molds

Ingredients:

4 cans full fat coconut milk (chilled in refrigerator)

2 lbs strawberries (fresh or frozen)

3 eggs

1-tablespoon vanilla paste

1 bunch fresh basil

2- 3 cups raw sugar

1 tsp. fresh squeezed lemon juice

2 trays of Popsicle Molds


Directions:


Clean and Cut the ends of the strawberries, set aside. Measure out the sugar, the vanilla. Open the cans of coconut milk and separate the fat. Measure the fat out to 2 cups. Set aside the coconut water from the cans. Prep the basil, cut off stems and gently chop up.

Put a large pot or Dutch oven over medium heat on the stove, place a small tsp. of olive oil, and cook the strawberries, sugar, and lemon juice together. You will want to stir frequently, until all the water comes out of the strawberries. (About 5-10 min) Add in the basil and vanilla paste. Cook for another 5 min.

You know it will be finished when the strawberries aren’t as tart, with a strainer take out the strawberry mixture from the pot, place in a blender and blend until smooth.

Set aside the left over liquid from the mixture.

Put the coconut milk into the pot, add in the strawberries, cook until everything is smooth and no lumps are shown.

Take the strawberry coconut mixture off the heat, stir in the 3 eggs, taste to see if needs more sugar, or strawberry, or even more coconut. You want a smooth creamy strawberry flavor to come through.

Once finished, add your mixture to your molds. Freeze for 6-12 hours depending on your freezer, and enjoy!!


Cooking Basics : Chicken Soup Recipe


Soups are by far the easiest and my most favorite thing to throw together. For entertaining, getting through the busy week or because it’s cold outside. I thought it would be good to start with the basics of cooking, with the foundation of a soup, simply because if you start every soup this way its very easy to build on. You can come up with any type of dish if you nail those basic principles. 

Lets begin:

 In French cuisine there are soups, sauces, stocks. These are usually the bases for other dishes to build on. Which would consist of a tomato sauces to put over pasta, any soup or stew dish, or even a sauce to place over meat. The base is a Mirepoix (pronounced “meer-pwah”) it is a mix of chopped carrots celery and onions. Traditionally it’s about 50% onions, 25 % carrots and 25 % celery. But honestly if you like more of one, for instance more carrots less onion, or an even amount of all feel free to break French rules and do it the way you like best!

Mirepoix is important because with this foundation your cooking magic can begin, the taste of these three alone are simply heavenly and can turn a bland anything into bursting taste! Also once you know how to start dishes you can then break the rule, that’s right friends. Nail the basics, and then break the rules. I would say that is true with a lot of things, being open to exploring the possibilities. Do you know what I am saying?

Let me also mention ingredients, I have stressed this once and I will stress this again. Fresh ingredients so key in cooking. They aren’t expensive, in fact if you shop at the right places such as your local farmers market, Trader Joe’s and yes whole foods you would be surprised at what you could find for little to nothing. The reason I stress fresh or “the best” ingredients is not because they look pretty, but they taste the best, they have the best nutrients, which is key, and well its going to awake your taste buds! So lets just agree on this one? Lets move on…


Starting your Soup:

 Ingredients/ Cooking Supplies:

-Dutch Oven or large Stockpot

-Wooden spoons for stirring and tasting

-Strainer, Culinary Knife’s, Peeler, Cutting boards

-Large mixing bowls, prep bowls

-1 lb. Yukon Gold or Red Potatoes

-2 16 oz. Chicken bone broth, or Kosher Chicken Stock   - or homemade

- 2-4 carrots

- 2-4 celery stalks

-1-2 onions

- 2-3 cloves of garlic

- A whole chicken, either precooked from the grocery rotisserie, or made at home.

- A bunch of fresh herbs and spices: thyme, oregano, and old bay seasoning salt, salt pepper

- Loaf of fresh country bread (or gluten free for those with sensitivity)

- Quality grade olive oil, or avocado oil (for high heat)

Directions: 

(Note: Prepping ingredients first will cut your cooking time in half. So we will be prepping all the food first setting it aside, and then getting on with the cooking.)

1. You can either roast your chicken at home or you could buy a precooked roast from the store. Leftovers of roast chicken make for great soups as well. This works if you are in a pinch for time! 

 2. Make your Mirepoix mix of carrots, celery and onions. Do your best here, its alright if it’s a rough chop, but just eye ball your cuts with the sizes being pretty even. Set aside in a bowl. Then finely chop your garlic cloves and herbs set aside. Quarter your potatoes, set in a large bowl of warm water, and let them soak for a good 15 – 20 min. When the chicken is finished roasting, break it down with knife, then pull apart the meat with fork or hands. (Set aside as well, you can keep the bones, and legs together).

3. Once you are finished prepping your ingredients, set your Dutch oven on the stovetop and put the burner on medium to medium high. After about a min, add in the olive oil place a few onion’s in the pan to see if it sizzles, if so the pan is hot enough. Through in the MirePoix mix, let cook for 5-10 min. Letting the vegetables cook until the onions are translucent. Add salt and pepper to taste, I would say about a pinch of each. Add in your garlic, sauté for another 3 min, and add in herbs and more salt and pepper if needed.

4. While that cooks strain your potatoes, and add those into the mix (you could always boil your potatoes before hand as well then add them to the pot.) Let that cook for another 5 min, add in more salt and pepper if needed.

5. Toss in the Chicken Stock and bring your heat up to high, you want this to boil for a good few min until you see a “rolling boil at the top of your soup”, then let that hang out for about 5 min. Then add in your cut up chicken, and bones. Reduce your heat to low and place a lid on the top, stirring your soup every 10 min, or to insure it doesn’t burn at the bottom. Cook for about 40 min to 1 hour. Then skim the top, and pull out the bones before serving.

Then serve with beer, white wine, crusty bread and enjoy! 


Works sited : 

The Culinary Institute of America. The Professional Chef 9th Edition. USA: WILEY, 2011.Print.

Dutch oven : LE  Cresuset 


Fancy Prosecco Cointreau Ice Cubes, Recipe


When I think of Champaign, Prosecco or Rose` I can't help but want to channel my inner Lady GoLightly. Aka Audrey Hepburn from Breakfast at Tiffany’s. Call it cliché’ call it typical, I don’t mind. Back in the day I used to watch that movie so many times. If I can be really honest, probably every other day! Fantasizing about how amazing her life would be to just have for a day. Live in New York City, wear fabulous clothes, be an actress.  You know what I mean right?

The thing is when I grew up I finally figured out what she did in the “Powder Room” with those men each evening. I’ll let your imagination run away on that one. Some how the charm of her glamorous lifestyle, of chic clothing, fancy parties and her tiny apartment seemed to take my breath away. (Although, Currently speaking it doesn’t look like it was all that fabulous after all.)

This shoot wasn’t fully inspired by Audrey, but after staring at my screen editing I couldn’t help but think of the movie. Of her, Of the Scenes of fancy parties with great music, and of Course Paul Darling. (Insert British accent from his mistress) How can we forget him?

I am sure she would have been smart enough to make fancy ice cubs for her drinks as well, or maybe she couldn’t afford an extra bottle of Prosecco to make them? Either way, I have a wonderfully easy way to spice up your Prosecco, or to keep your glass chilled. And while your making them, maybe channel your inner Audrey, you know she is in there! 


Prosecco Ice Cubes, with Fresh Blueberries and Cointreau, Recipe

Ingredients and Materials:

-2 rubber ice cube trays, (I find these are the easiest to use, the ice cubes pop out really easy)

-1 bottle of Prosecco (Lamarco is a great one!)

- 1 bottle of Cointreau, orange liquor

-1 bunch of fresh BlackBerries, or any that is in season

- A tea towel to wrap the Bottle of Prosecco with when opening

Directions:

First make sure to chill your Prosecco in the fridge for at least an hour, to speed up the process you can throw it in the freezer. Just don’t forget it, I have totally done that before and ended up with ice of course.

Take the tea towel and wrap it around the chilled Prosecco, pull the top off straight up away from your face. Go slow! Unless you are a pro and use a saber. Grab your ice trays; fill them with the Prosecco leaving room for the Cointreau and berries. Then add in a splash (about ½ tablespoon) of Cointreau in each ice cub spot, and fill to top. If desired add in berries to each cube.  Freeze for a good 6-12 hours. (Depending on your Freezer. This also works if you choose to leave the berries out.

When serving the Prosecco, add in one or two ice cubes to your glass and enjoy!


Cheers Friends! 

-Nicole